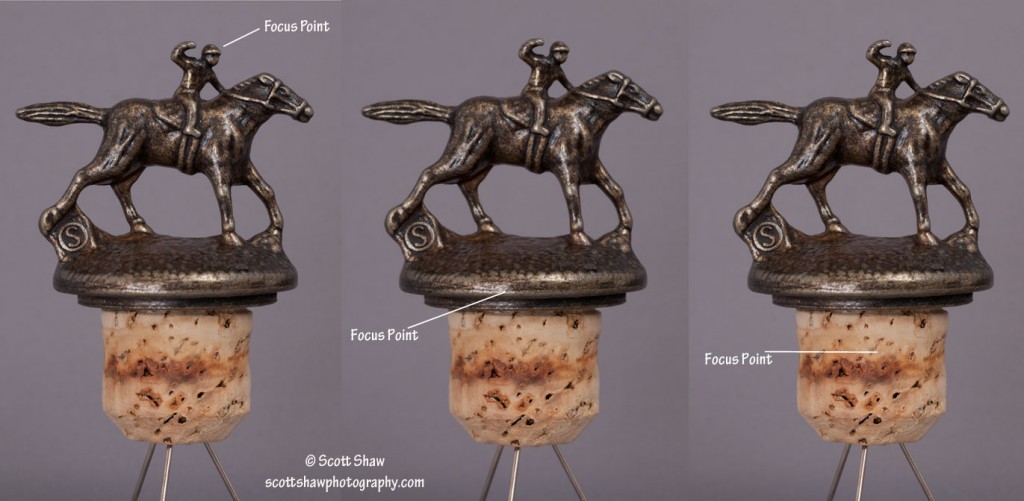
The first problem I ran into was consistency between images. I started with my camera set to Auto White Balance. This created slight differences in light color between images. To achieve color consistency between images, I used my X-Rite ColorChecker Passport in a test image. I then used Lightroom to determine the White Balance setting of my lighting set up, which turned out to be 3200K. I set the manual white balance on my camera to 3200K and, viola, consistent white balance between images.
With the front of my lens less than one foot from the stoppers, depth of field became the next issue requiring attention. If I focused on the jockey’s head, the focus on the front edge of the stopper and the cork would appear soft. So no matter which of those three points I focused on, the other two appear soft.
To address the depth-of-field issue, I took three images of each stopper. Using manual focus, the first image focused on the jockey’s head. The second image focused on the front edge of the stopper. The final image focused on the front of the cork. Click on the image above to enlarge it and look at the three focus points and then look at the other two points to see this softness. It is not much, but it does make a difference.
Once I made the three images I brought them all into Photoshop and used the stacked focus feature to create a single image with all three areas sharp.
When you travel away from home, how do you find the scenic areas? Talk to the locals! While visiting the Maine Sea Salt Company during summer vacation, Pat (Mrs. Salt Man as she jokingly calls herself) told us about Jasper Beach. The entire beach is composed of these amazing smooth stones. The closer you get to the water’s edge, the smaller and smoother the stones become.
As the waves come in and out, the smaller stones rolling around in the surf make the most amazing sound. Think of a bucket full of water and smooth stones. As you pour the stones and water out you get a nice “ssshhhhhh” sound. We actually sat on the beach for an hour listening to the sound. Of course, we didn’t think to use our phones to record the sound until the next day!
This image was exposed for 1/10 second at f/22. The slow shutter speed blurs the water as it rolls in on the stones while the small f-stop creates a deep enough depth of field to keep the stones in focus from front to back.
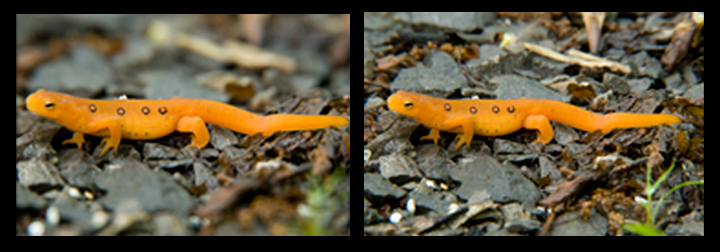
Simply put, Depth of Field is the amount of the image that is in sharp focus. In the images above, the one on the left has a “shallower” depth of field. Note that the small green plant in the right foreground and the rocks in the background are blurred. The image on the right has a “deeper” depth of field since the small green plant is somewhat more in focus as are the rocks behind the salamander.
The aperture setting on your camera controls depth of field. The smaller the aperture, the more depth of field. I took the image on the left using an aperture of f/5.6 while the one on the right was taken with an aperture of f/22. (Confusing to the novice, but an aperture of f/22 is smaller than an aperture of f/5.6).
So what does depth of field mean to your outdoor photography? Use your aperture setting to highlight a subject or isolate it from the background. In the image on the right, the rocks in the background and the small plant distract the viewers eyes from the salamander which is the main subject. By reducing depth of field the viewer is drawn to the salamander.
Which image do you like better?
Click here is a more technical tutorial on depth of field.


